Monday, September 13, 2010
Love Me Some Lattice
Can you say, "Texture Overload?" WOW. I just received my Lattice Embossing folder from Stampin' Up and let's just say, "It's love at first sight!" I wanted to participate in this week's Pals Paper Arts color challenge, so I thought I would just "try" out my new fun folder and I guess I went overboard. I also just received my fun Island Floral die-cut, so I thought it best to play with that too. However, after running my big flowers through the handy-dandy Big Shot, I thought - "boring" - they need texture too. The lattice texture reminds me of a beachy, islandy scene and so what better than to incorporate the island flowers, right??? Okay, not really, but it was sure fun to make. Sorry for the BLAH looking photo. So Saffron and cloudy days don't mix. Thanks for looking!!!
Recipe:
(all Stampin' Up)
Stamps: none
Ink: none
Paper: So Saffron, Old Olive, Tempting Turquoise, Kraft and Sweet Pea DSP
Cool Tools: Big Shot, Island Floral Die, Crop-a-Dile, Scallop Edge Punch and Paper-Piercing/Mat tool(s)
Accessories: Jumbo Pewter Eyelet, Filigree Brad and twine
Saturday, September 11, 2010
Thomas-the-Train Invitation
Isn't this invitation, "cutie-patootie?" I love how it turned out and it was totally worth all the time and effort. My youngest son is completely and hopelessly infatuated with Thomas. He loved it so much that he carried around an invitation until it fell apart. I cannot take any credit for this creativity, as I completely snagged the idea from a generous paper-crafter on SCS here. I found the Thomas face online and just re-sized and cut to fit the invitation. All products were Stampin' Up.
Friday, September 10, 2010
Beautiful Butterfly Card Organizer
WOW. . . It's been a long time since I posted. Here's a card organizer that I made for one of my Stamp Club members. I made something similar for everyone, but this is my favorite. I found the tutorial here. All items were SU, except the chipboard for the cover and back. I am not listing my recipe because I feel like I made this a million years ago, but all the paper was from the Sweet Pea DSP pack. Shoot me an email if you have any questions. Toodles!
Sunday, March 7, 2010
Fancy Flower
Spring is ALMOST here. I can feel it, kind of. I love these semi-warm days when you can crack open a few windows and air out the house a bit. I am ready for warmer weather.
Here's another card I did at Stamp Club last month. I love these easel cards. What a neat way for the card "receiver" to display your handiwork. I found the tutorial HERE at Splitcoaststampers. I could not figure out the folding until an hour before club and I decided that I better watch the video tutorial. POW - it clicked and worked. Phewwww. . . I am so spatially challenged, so the video tutorials work best for me. I was going to look very BAD in front of my club ladies, if I didn't figure it out. My mom always said my name should've been, Lucy, as in "last-minute Lucy." Hee, hee. Some things never change. I found another great video tutorial on how to make the "poofy" flowers HERE. These are just so much fun. I am submitting this card for the Pals Paper Arts Challenge, which is anything Spring. I absolutely adore Peonies and this little flower reminds me of them. So big and poofy. . . Nothing more says Spring than butterflies and big poofy flowers. Later. . .
~~~~~~~~~~~~~~~~~~~~~~~
MY RECIPE:
Ink: Rich Razzleberry
Stamps: Kindred Spirits
Paper: Rich Razzleberry, Whisper White, Old Olive, Kraft, vellum and Cottage Wall DSP
Accessories: paper-piercing tool, mat pack, uni-ball Signo Gel Pen, Scallop Circle Punch, brad, Scallop Punch, Build-a-Brad, Large Oval Punch and Hemp Twine
Big Shot: Lots of Tags and Beautiful Wings die cuts
Thursday, February 25, 2010
Bookmark Card
Good Morning! The sun is shining, but it's deceiving. . . It's still frigid outside. I am READY for Spring. Here's another project from Stamp Club. I made this bookmark card using the Splitcoaststampers tutorial found HERE. I adore this idea! Send a beautiful handmade card to someone special and they can keep a part of your special creation by using the attached bookmark. I sent my first one to a friend for her birthday and she LOVED it. I think my club ladies like the idea too. . . The best part - the card still measures 4-1/4" x 5-1/2, which means it will fit neatly into a standard envelope. I got the inspiration for the colors from my new Basic Gray satin ribbon. I was dying to use it on something, so I built my color scheme accordingly. The layered flowers were seen HERE first. I loved how she used completely different colors for the flower layers. Very cool.
Thanks for looking. Oodles of Toodles!
~~~~~~~~~~~~~~~~~~~~~~~
Paper: Rich Razzleberry, Pink Pirouette, Basic Gray, Old Olive, Basic Black and Guest Book DSP (card front); Rich Razzleberry, Basic Gray, and Whisper White (bookmark); Kraft (card/bookmark base)My Recipe:
Stamps: Fifth Avenue Floral, Define Your Life and En Francais (background stamp)
Ink: Rich Razzleberry, Pretty in Pink, Basic Gray, Basic Black, Old Olive and Jet Black Stazon (flowers)
Stamps: Fifth Avenue Floral, Define Your Life and En Francais (background stamp)
Ink: Rich Razzleberry, Pretty in Pink, Basic Gray, Basic Black, Old Olive and Jet Black Stazon (flowers)
Accessories: distressing tool, perforating tool, sponges, Extra Large Two-Step Bird Punch (leaves), Basic Gray 5/8" Satin Ribbon, staples, Chit-Chat Rub-ons, Stampin' Dimensionals and Modern Label Punch
Bling: Clear Rhinestone Brad
Tuesday, February 23, 2010
KISS the Bird
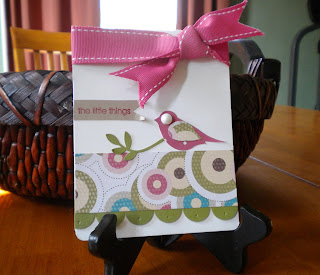
Not that I would ever considering kissing a bird, but isn't he/she cute? This is my submission for the Pals Paper Arts KISS (Keep It Simple Sweetie) Challenge. Keeping it simple is NOT simple for me. I tend to go overboard, so this is definitely a good challenge and one I should try more often. I used this for my Stamp Club this past weekend and I think the ladies enjoyed the simplicity. I believe it was my favorite out of all three projects. Come back this week, as I will post the other two projects we completed at club. Have a marvelous day! Toodles.
~~~~~~~~~~~~~~~~~~~~~~~
My Recipe
Stamps: Enjoy Every Moment
Ink: Rose Red
Paper: Whisper White, Old Olive, Kraft and Sweet Pea DSP
Tools: Extra Large Two-Step Bird Punch, 3/4" Circle Punch, paper-piercing tool w/ mat, & Corner Rounder
Bling: 1" Rose Red Double-Stitched Grosgrain ribbon and white halfback pearl (Pretties Kit)
All products are by Stampin' Up.
Tuesday, February 16, 2010
Think Spring and it will come. . .
We just received more snow Sunday evening and as much as I am a proud supporter of snow, I must admit that I am sick of the white stuff. I thought if I made a card with a "springy" theme, then I could make the winter doldrums go away. At least in my mind. . .
I am playing along with Pals Paper Arts Challenge #29. This week it's a sketch challenge. I thought I would use this card for my club this weekend. I absolutely adore Stampin' Up's Rich Razzleberry. So pretty with the Old Olive. The butterflies just scream "SPRING!" I love this new embosslit die. Very quick and easy. Just take a scrap of your favorite color, run it through the Big Shot and presto, beautiful butterflies.
I hope you are finding peace and warmth where ever you may be. Toodle-oo!
~~~~~~~~~~~~~~~~~~~~~~~~~~~~
What did I use:
Stamps: Kindred Spirits
Ink: Rich Razzleberry
Paper: Whisper White, Rich Razzleberry, Old Olive, Orchid Opulence and Cottage Wall DSP
Accessories: 5/8" Old Olive Grosgrain ribbon, glue dots, and halfback pearl
Tools: Scallop Trim Border punch
Big Shot Stuff: Stampin' Up Backgrounds 1, Top Note, and Beautiful Wings
Technique: nothing special
All products are from Stampin' Up
Tuesday, February 9, 2010
Hubby's Valentine Card
Since I don't have enough time to participate in each challenge separately, I like to combine both. This week I am participating in Papertrey Ink's Color Challenge, as found on Nichole Heady's blog, Inspired Papertrey Ink & Nichole Heady. You can choose from several PTI designers favorite color schemes. Take some time and check out these amazing designers. I drool every time I look. After much debate, I chose Niki's, but I must say it wasn't an easy decision. Because Valentine's Day is quickly approaching, I needed a card for my husband. Something that says love and manly, at the same time. I liked the kraft and olive green colors in Niki's scheme. I plan on putting the rest of the color schemes in my idea folder for when I need some inspiration. The second challenge is the Diva Coffee Break Designs sketch challenge #163. I must admit, I was initially attracted to this challenge based only on their name and my fierce relationship with coffee. Without it I wouldn't be here, I would be sleeping. . .
~~~~~~~~~~~~~~~~~~~~~~~~~~~~~~~~~~~~~~~~~~~~~~~~~~~~
My Goody List
Stamps: French Script
Ink: Chocolate Chip
Paper: Kraft, Melon Mambo, Old Olive and Pink Pirouette
Extras: 1-3/8" Circle Punch, Scallop Circle Punch, Heart to Heart Punch, button, and twine
(all products are Stampin' Up)
Tuesday, January 26, 2010
Bella Rose Box
It's Tuesday! Time for my Pals Paper Arts submission, anything BUT a card. I made this special box before Christmas, just in case I needed an extra gift to give. Needless to say, I didn't need an extra gift, so I get to use it today. I love to make these wonderful origami boxes. They make perfect gift boxes. You can fill it with chocolates, jewelry and anything that measures less than 4" x 4". I found the tutorial for this wonderful project here. I absolutely adore Stampin' Up's Bella Rose DSP. I wish I would've stocked up on more before it retired. It works perfectly for girls of all ages, big and small. One great aspect of these little boxes is that they can work for anyone. With the right DSP, boys of all ages could enjoy. Who doesn't love decorated boxes to store stuff? Thanks for stopping by today.
My Stuff:
Ink: riding hood red, basic black
Stamps: dreams du jour, fundamental phrases
Paper: bella rose dsp, kiwi kiss, pink pirouette, riding hood red, whisper white
Tools: round tab punch, 5 petal flower punch, vintage brad, jumbo pewter eyelets, crop-a-dile, pink pirouette grosgrain ribbon
Big Shot: top note die, little leaves
Monday, January 18, 2010
PPA25 and Cards for St. Jude
I must say that I am glad the weekend is over. Sometimes, it's nice to get back into a routine. The kids had several social and sports activities. People used to tell me that parenting got harder as the kids got older, not easier. I was skeptical, but now I understand. Trying to keep up with busy social lives and sports schedules, is hair wrenching at times, but at least the older ones sleep through the night. A good trade off, in my book. I did get out and do some stampin' and socializing with fellow Stampin' Up demonstrators this weekend. I always enjoy making projects and talking with friends. I now understand the attraction of quilting guilds.
I made this card yesterday for the Pals Paper Arts Challenge 25. I also wanted to make a Valentine's Day card for the children at St. Jude's Hospital (Cards for St. Jude's), so I needed the card to appeal to little ones. Unfortunately, I found out this morning that they have reached their goal of 200 cards to send to St. Jude's. Instead, I may look into sending some cards to the children's cancer center at one of our nearby children's hospitals. I think these special children could use a nice "pick-me-up" on Valentine's Day. Cards for St. Jude's was such a great idea, why not spread it locally?
Onto my card - my base card measures 4-1/4" x 5-1/2 (Whisper White). I used Basic Black, Real Red and Kraft for the layers. I stamped the adorable skunk from the Pun for Fun stamp set onto the Kraft paper, using Basic Black Classic Ink. I used the masking technique, if I felt the skunks may overlap. The red skunk was stamped separately onto Whisper White and heat embossed using the black embossing powder. I then colored him in using a Real Red marker and cut him out to add over a previously stamped image on the Kraft paper. This gives him a 3-D look, so cute. I colored the flowers in with the Real Red marker and I also outlined the stamped skunks with the black journal marker to give them more depth. My red skunk got a 3-D pink heart, instead of a flower, to make him even more special. I added some Real Red polka-dot ribbon around the top, to hide the "lack" of images underneath. I absolutely LOVE embellishments. The amount of embellishments I have on a card, usually equals the number of mistakes - hee, hee. I finally stamped Mr. Skunk's sentiment, I stink you are sweet!, onto Real Red using Basic Black ink. I punched the sentiment out with the Modern Label punch and used black brads to adhere to all the layers. Voila! I must admit this is not one of my favorites. I don't know if it goes outside my comfort zone or what, but no matter how much I did to it, I still wasn't happy. I guess there just comes a time when one needs to stop, accept it and move on. I got the idea from a card I viewed on SCS, but I must say her card seemed much more appealing. I wanted to use the skunk because kids get such a giggle out of the sentiment, I stink you are sweet!, and these children definitely need a good laugh.
Thanks for checking out my card today and please say some extra prayers for those still suffering in Haiti.
Tuesday, January 12, 2010
PPA24 Challenge & KWerner Color Inspiration
WOW, my first blog post ever. Welcome to the 21st century, Kelli. Here is my entry for the PPA24 Challenge at Pals Paper Arts and the Color Inspiration Challenge at KWernerdesign.
This is my first sketch and color challenge and I must say it's more daunting than I would've initially thought. I assumed I would lay out the colors accordingly and cut, paste, distress, etc. . ., but then I tend over analyze, making a project tougher than it should be. Thanks for stopping by and checking out my new site. Wherever you are, I sure hope you are staying warm. . .
~~~~~~~~~~~~~~~~~~~~~~~~~~~~~~~~~~~~~~~~~~~~~~~~~~~~~~~~~~~~~~~~~~~~
My Recipe: all products are Stampin' Up
Paper: Kraft, Baja Breeze, Cameo Coral, Riding Hood Red, and So Saffron Card Stock
More Mustard DSP
Ink: Baja Breeze, Riding Hood Red, So Saffron and More Mustard
Bling: Flower Designer Brad
Tools: Modern Label Punch, Hemp Twine, Big Shot w/ Daisies #2 die-cut, sponges, Distressing Tool, Paper-Piercing Tool w/ Mat Pack, and Signo Gel Pen.
Stamps: NONE - Chit Chat Rub-On
Technique: sponging, faux-stitching
Subscribe to:
Posts (Atom)